
Submit a form programmatically
Use the form endpoints when a system needs the same entry point as the hosted form. Public forms need no credentials; protected forms use a short-lived bearer token.
Submitting Forms Programmatically
Section titled “Submitting Forms Programmatically”The hosted form is just a client over a small HTTP API. To run a workflow without the UI — for example, a system submitting a CSV — upload the file, then submit it.
Both endpoints are namespaced to your form: https://run.quickflo.app/f/@<org>/<form-name>/<action>. Public forms need no credentials; password-protected forms authenticate first.
Step 0: Authenticate
Section titled “Step 0: Authenticate”Skip this for public forms. If the form is password protected, every endpoint below — upload, data, confirm, and the signed-URL endpoints — needs a bearer token.
The username and password are a Form Auth connection: you create one per user under Connections, then authorize it on the form under Form Settings → Access Control. Exchange those credentials for a session token at the auth endpoint:
curl -X POST https://run.quickflo.app/f/@your-org/lead-intake/auth \ -H "Content-Type: application/json" \ -d '{ "username": "partner@acme.com", "password": "..." }'{ "token": "eyJhbG...", "expiresIn": 3600, "username": "partner@acme.com" }The token is good for one hour. Add it to every call below:
-H "Authorization: Bearer $TOKEN"Step 1: Upload the file
Section titled “Step 1: Upload the file”POST to the form /upload endpoint as multipart, field name file:
curl -X POST https://run.quickflo.app/f/@your-org/lead-intake/upload \ -F "file=@leads.csv"{ "url": "gs://.../leads.csv", "filename": "leads.csv", "size": 184320, "mimeType": "text/csv" }File fields cap at 5 MB by default. Raise the Max file size on the file field in the form builder to accept bigger uploads; for CSVs over ~32 MB, use the signed-URL flow instead.
Step 2: Submit the form
Section titled “Step 2: Submit the form”POST to the form /data endpoint with your fields as JSON. Set the file field to the object the upload returned — this runs the workflow:
curl -X POST https://run.quickflo.app/f/@your-org/lead-intake/data \ -H "Content-Type: application/json" \ -d '{ "leads": { "url": "gs://.../leads.csv", "filename": "leads.csv", "size": 184320, "mimeType": "text/csv" } }'This causes the workflow to execute, where the file is accessible as {{ initial.leads }}.
The full sequence of requests:
BASE="https://run.quickflo.app/f/@your-org/lead-intake"
FILE=$(curl -s -X POST "$BASE/upload" -F "file=@leads.csv")curl -s -X POST "$BASE/data" -H "Content-Type: application/json" -d "{ \"leads\": $FILE }"
See this example workflow that accepts a CSV and processes each row.
Large files
Section titled “Large files”Direct uploads support files up to about 32 MB. For larger CSVs, use a signed upload URL.
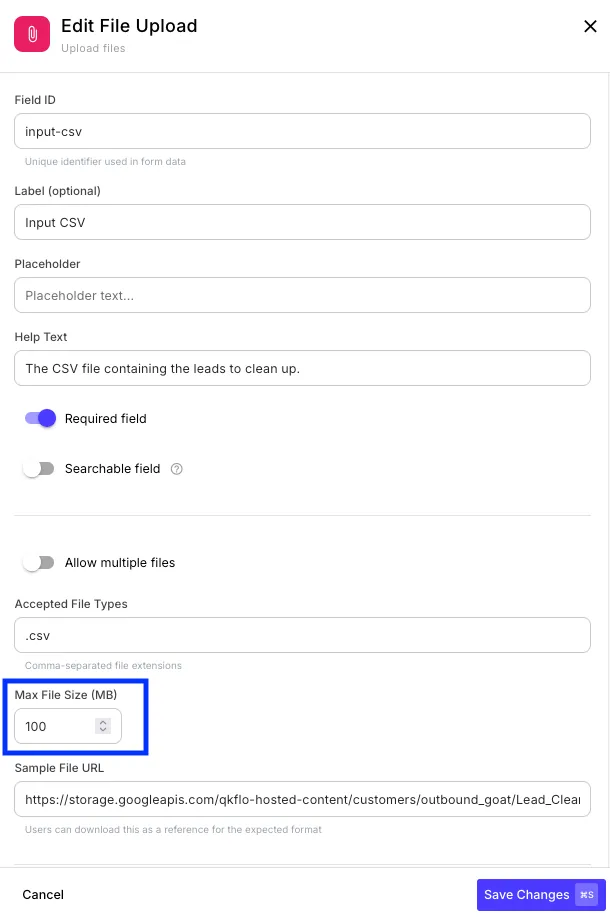
First, raise the file field’s Max file size in the form builder, then use the upload-url form endpoint to upload the file.
BASE="https://run.quickflo.app/f/@your-org/lead-intake"
# 1. Get a signed URL — send the file's name, size, and typeSIGNED=$(curl -s -X POST "$BASE/upload-url" \  -H "Content-Type: application/json" \  -d '{ "filename": "leads.csv", "size": 47185920, "contentType": "text/csv" }')SIGNED_URL=$(echo "$SIGNED" | jq -r .signedUrl)GCS_PATH=$(echo "$SIGNED"  | jq -r .path)EXEC=$(echo "$SIGNED"      | jq -r .executionId)
# 2. PUT the bytes straight to storage — Content-Type must match step 1curl -X PUT "$SIGNED_URL" -H "Content-Type: text/csv" --data-binary @leads.csv
# 3. Confirm — verifies the file landed and returns the file referenceFILE=$(curl -s -X POST "$BASE/upload-confirm" \  -H "Content-Type: application/json" \  -d "{ \"path\": \"$GCS_PATH\", \"filename\": \"leads.csv\", \"contentType\": \"text/csv\", \"executionId\": \"$EXEC\" }")
# 4. Submit — same as the simple path; the workflow runs over every rowcurl -s -X POST "$BASE/data" -H "Content-Type: application/json" -d "{ \"leads\": $FILE }"
A few things to know:
- The signed URL is valid for 15 minutes.
PUTthe bytes and confirm within that window, or request a new one. - The
Content-Typeon thePUTmust match thecontentTypeyou sent toupload-url— the signed URL is bound to it. - Carry the
executionIdfrom step 1 into step 3.upload-confirmrequires it; it’s how the confirm ties back to the file you reserved. upload-confirmreturns the same{ url, filename, size, mimeType }shape as the simple upload, so step 4 is identical either way.- If the form is protected, the
Authorizationheader goes on the QuickFlo calls (upload-url,upload-confirm,data) — not on thePUT, which is already authorized by the signed URL.