
List Sync — Salesforce
The QuickFlo Connector is a lightweight Salesforce package that watches records you care about and sends each change to a QuickFlo workflow as a webhook. Use it to keep external systems in sync, enrich leads on the fly, build an audit trail, or kick off automation when records match specific criteria.
This guide walks through installing the package, configuring which objects and events to track, and where to look when something goes wrong. The Salesforce-to-Five9 field and list mappings are defined separately in QuickFlo — see QuickFlo: Configure List and Field Mappings below.
How It Works
Section titled “How It Works”When a Salesforce record is created, updated, or deleted, an Apex trigger on the configured object evaluates your rules and — if they pass — enqueues an asynchronous job that POSTs a JSON payload to your QuickFlo webhook endpoint. You configure what to send in Salesforce; QuickFlo decides where it lands and how it’s shaped.
For the technical detail of how the trigger handles bulk volume, retries, and failures, see Salesforce: Under the Hood below.
Salesforce: Install the Package
Section titled “Salesforce: Install the Package”-
Open the install link
Click this link while logged in as a Salesforce admin:
For a sandbox, replace
login.salesforce.comwithtest.salesforce.comin the URL. -
Enter the installation password
Paste the installation key you received from your QuickFlo implementation resource.
-
Choose “Install for Admins Only”
Recommended so that regular users can’t modify the connector’s configuration. Triggers still fire on every user’s DML regardless of this setting — it only controls who can see and edit the setup tab. Grant access to specific non-admin integration managers via the
QuickFlo Adminpermission set. -
Assign the permission set
Once install completes, assign the QuickFlo Admin permission set to yourself (or whichever user will manage the configuration). Setup → Permission Sets → QuickFlo Admin → Manage Assignments.
Salesforce: Add the Remote Site
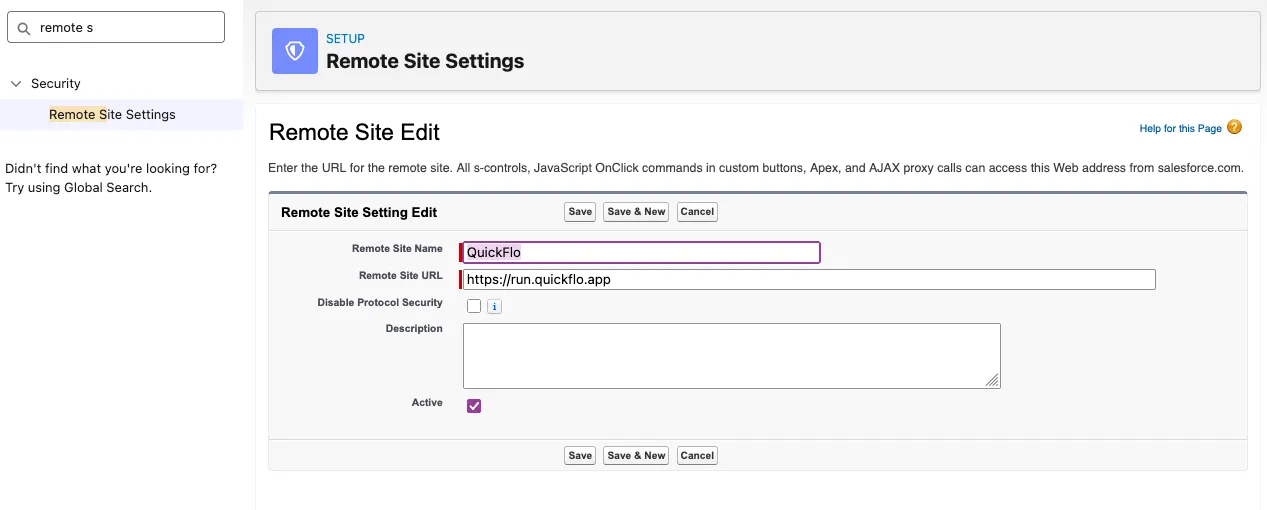
Section titled “Salesforce: Add the Remote Site”Salesforce blocks outbound HTTP callouts to any domain not registered as a Remote Site. Before the connector can deliver events, you need to whitelist the QuickFlo endpoint.
-
In Salesforce, go to Setup and search for Remote Site Settings in the Quick Find box.
-
Click New Remote Site.
-
Fill in the form:
- Remote Site Name:
QuickFlo - Remote Site URL:
https://run.quickflo.app - Active: checked
- Remote Site Name:
-
Click Save.
Salesforce: Connect to QuickFlo
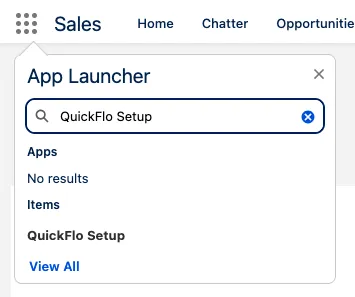
Section titled “Salesforce: Connect to QuickFlo”Open the QuickFlo Setup tab from the App Launcher.
-
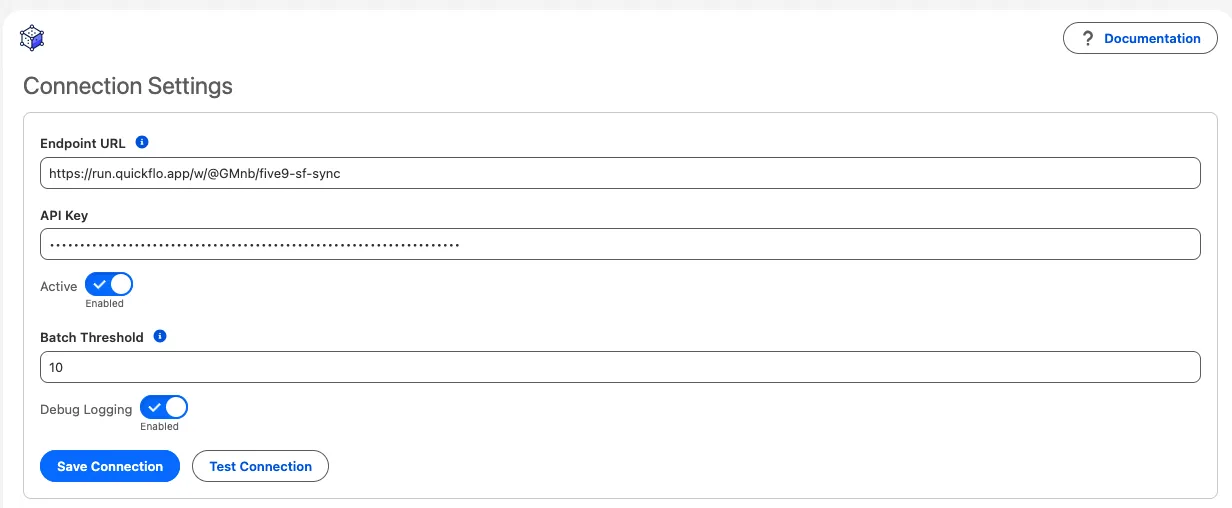
Endpoint URL — Paste the webhook URL from your QuickFlo workflow. It will look like
https://run.quickflo.app/w/<id>/<workflow-slug>. -
API Key — Paste the shared secret from the same workflow. QuickFlo sends this in the
Authorizationheader so your workflow can verify the request is legitimate. -
Active — Toggle on to enable outbound syncing. Leave off during initial setup if you want to configure everything before firing any events.
-
Batch Threshold — Maximum number of records per HTTP request. Default
10. Large DML operations are automatically split into batches of this size. Raise for high-throughput integrations, lower if your receiving endpoint is slow. -
Debug Logging — Enables verbose
System.debugoutput for troubleshooting. Leave off in production unless you’re actively debugging, since it generates a lot of log volume. -
Click Save Connection, then Test Connection to send a ping and confirm credentials are valid.
Salesforce: Subscribe to Objects and Events
Section titled “Salesforce: Subscribe to Objects and Events”The Synced Objects section lists every object the connector can track. Standard objects (Lead, Contact, Account, Opportunity, Campaign, CampaignMember) are preconfigured. Click + Add Custom Object to track a custom object.
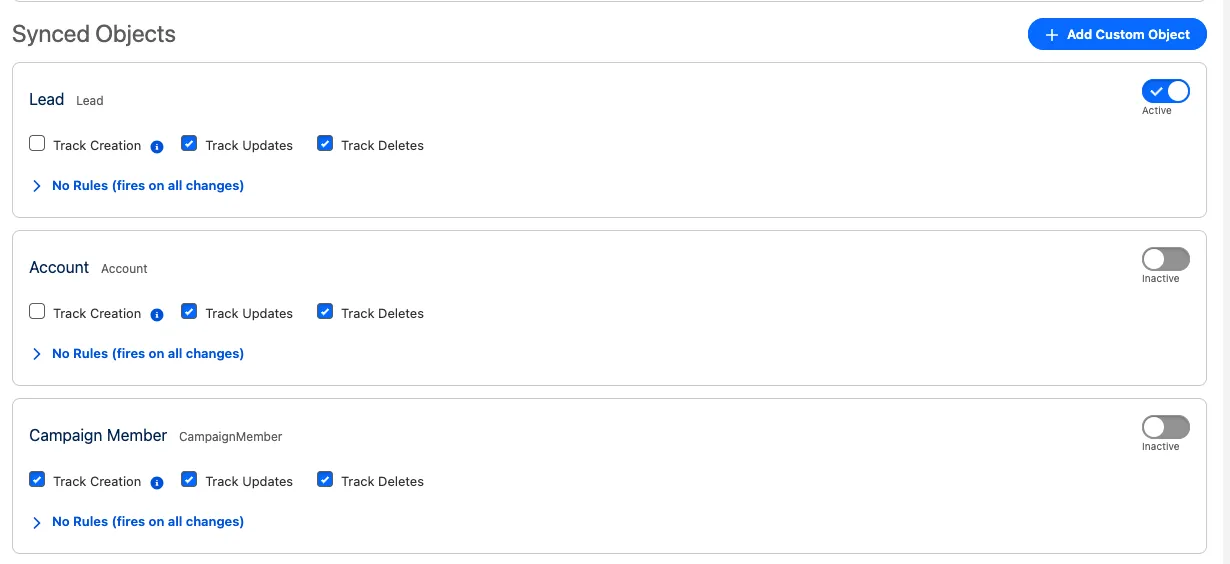
Each object has three toggles that control which DML events are sent:
| Toggle | When it fires |
|---|---|
| Track Creation | A new record is inserted |
| Track Updates | An existing record is updated |
| Track Deletes | A record is deleted |
Why Are All Three Tracked by Default?
Section titled “Why Are All Three Tracked by Default?”A record can reach your list three ways, and each fires a different event.
- Track Creation catches inserts. Every new record fires an insert, whether it came from a bulk load (Data Loader, the Bulk API) or a single hand edit. Bulk loads are the case that matters: a freshly imported record fires an insert and nothing else, so if creation isn’t tracked, the entire import is missed.
- Track Updates catches edits to existing records. A rep changing a field, or an automation writing one back, fires an update.
- Track Deletes catches deletions, so a record removed in Salesforce is removed downstream.
Tracking all three means a record lands on your list however it got there.
The create-then-update case
Section titled “The create-then-update case”A single create can fire both a creation event and an update event. This happens when automation re-saves the record in the same transaction: a workflow field update, a Flow, or (for Leads and Cases) an assignment rule that sets the owner. Salesforce runs the insert, runs the automation, then fires the update.
It is not universal. It only happens on objects that have this kind of automation, and the source matters. Workflow field updates and Flows run on both manual and bulk creates. Assignment rules run on a UI create but not on a Data Loader insert, unless the import explicitly sets the assignment header. So the duplicate is most common on hand-created Leads and Cases, and rare on bulk imports.
If an object is only ever edited in place and the extra event is a problem, turn off Track Creation for it. Leave it on for anything that receives bulk loads.
Salesforce: Filter with Trigger Rules
Section titled “Salesforce: Filter with Trigger Rules”If you only want to fire the webhook on specific changes, expand the Rules panel on any object and add one or more rules.
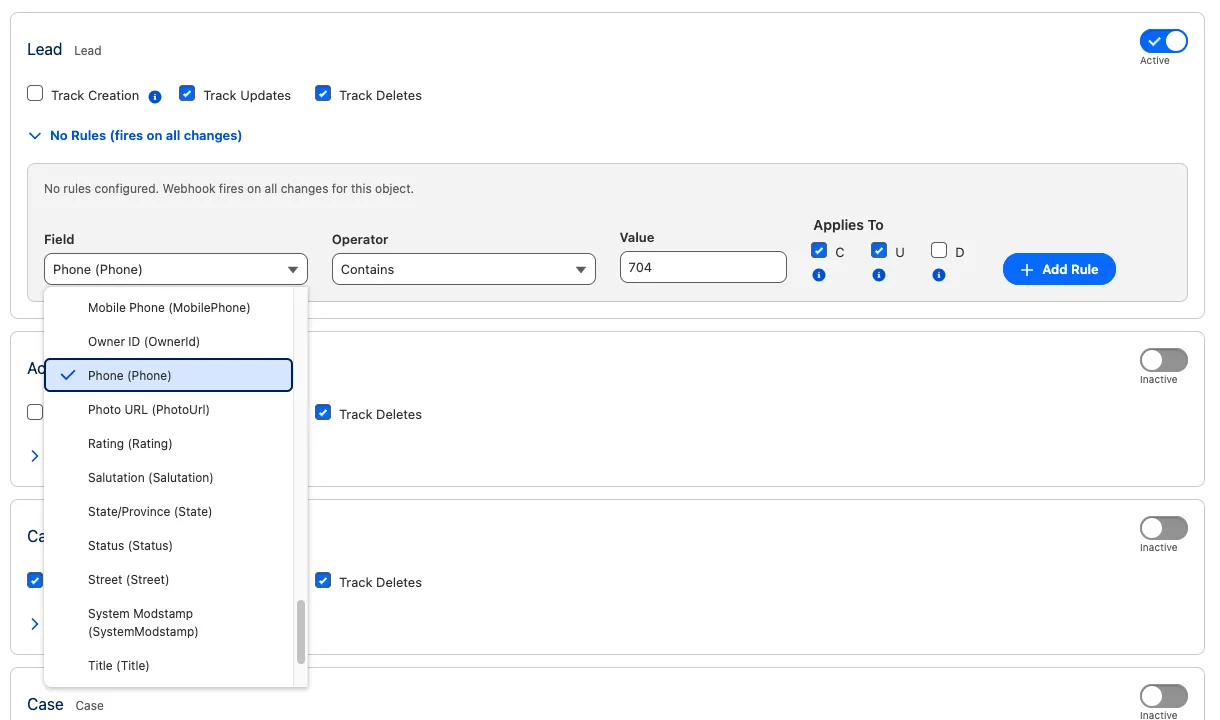
A rule consists of:
- Field — the field to evaluate
- Operator — one of
equals,not equals,changed,contains,is blank,is not blank, etc. - Value — the comparison value (disabled for valueless operators like
changedoris blank) - Applies To — which events the rule gates:
- C — record matches the rule at creation
- U — record matches the rule after update (regardless of previous value)
- D — record matched the rule at the time it was deleted
Multiple rules on the same object are evaluated with AND logic — every rule must pass for the event to fire. If no rules are configured, every change passes through.
We recommend gating every object with at least one filter, so only qualified records reach the dialer. A single boolean usually does it: a field like is_dialable that reliably says whether a record should be synced. With no rules, every change is sent, including records that should never be called.
QuickFlo: Configure List and Field Mappings
Section titled “QuickFlo: Configure List and Field Mappings”Everything above decides what Salesforce sends. The QuickFlo workflow decides what to do with it — which Five9 list each record lands in, which fields map where, and any transforms on the way through.
Those mappings live in a QuickFlo data store. Your implementation resource wires them with you on a call. Typical contents:
- Salesforce object → Five9 list (e.g. Leads in Campaign X →
Inbound_Q2) - Salesforce field → Five9 column (e.g.
MobilePhone→number1) - Transforms — phone formatting, timezone, disposition normalization
Salesforce: Under the Hood
Section titled “Salesforce: Under the Hood”How the trigger handles volume and failures — useful if you’re evaluating operational risk or debugging unusual behavior.
- Asynchronous — The trigger never blocks the user’s save. Payloads are sent from a Queueable job after the transaction commits.
- Per-record batching — Bulk operations (data loader, list views, flows) are chunked into batches so a 10,000-row update doesn’t hit Salesforce’s callout or heap limits.
- Retry with backoff — Transient failures (5xx, timeouts) are retried up to 3 times with a short escalating delay. Permanent failures (4xx) are recorded once and not retried.
- Dead-letter queue — Every failed delivery lands in a
QF_Sync_Error__crecord with the full payload, status code, and reason, so nothing is silently dropped.
Advanced: exactly how retry and the dead-letter queue behave
Everything below is the Salesforce side — the package delivering a payload to QuickFlo. What happens after QuickFlo accepts a payload is covered under QuickFlo: View Sync Results.
Retry timing (Salesforce side). Each delivery is attempted up to 3 times. Transient failures (HTTP 5xx, 408, 429, or a callout timeout) re-enqueue with a short escalating delay — about 1 minute, then 2 — so a brief QuickFlo deploy or restart doesn’t burn every attempt in seconds. After the third failure the payload is dead-lettered. Permanent failures (4xx other than 408/429 — bad auth, validation) are not retried; they go straight to the DLQ on the first attempt.
Where the Salesforce side ends and QuickFlo begins. The Salesforce retry loop and the QF_Sync_Error__c dead-letter queue only cover the Salesforce → QuickFlo hop. The moment QuickFlo returns 200, responsibility moves to QuickFlo — anything that goes wrong afterward (transform, field mapping, the push to Five9) is not in the DLQ. It surfaces in the QuickFlo Sync Dashboard instead. A record missing from Five9 with an empty DLQ always means “look in QuickFlo, not Salesforce.”
DLQ record fields (Salesforce side). Each QF_Sync_Error__c row stores the full payload, the object and operation, the HTTP status code, the error message, the attempt count, and a manual Resolved__c flag.
Duplicate delivery is possible by design. A callout that times out after QuickFlo already processed the payload still counts as a failure on the Salesforce side, so it gets retried — meaning QuickFlo can receive the same payload more than once. Every payload carries a unique eventId so a repeat can be recognized and discarded on the QuickFlo side. This is why delivery is at-least-once, not exactly-once.
QuickFlo: View Sync Results
Section titled “QuickFlo: View Sync Results”When a record isn’t showing up in Five9, the QuickFlo side is usually the first place to look — not the Salesforce dead-letter queue. The DLQ only catches failures where Salesforce couldn’t deliver to QuickFlo. If the payload arrived in QuickFlo but something went wrong transforming or pushing it to Five9, the DLQ is empty but QuickFlo has the full record.
Sync Dashboard
Section titled “Sync Dashboard”The Sync Dashboard is the primary investigation tool. It logs one row for every attempted CREATE, UPDATE, or DELETE operation against a Five9 list — successful or failed — with the error kind and error message inline.
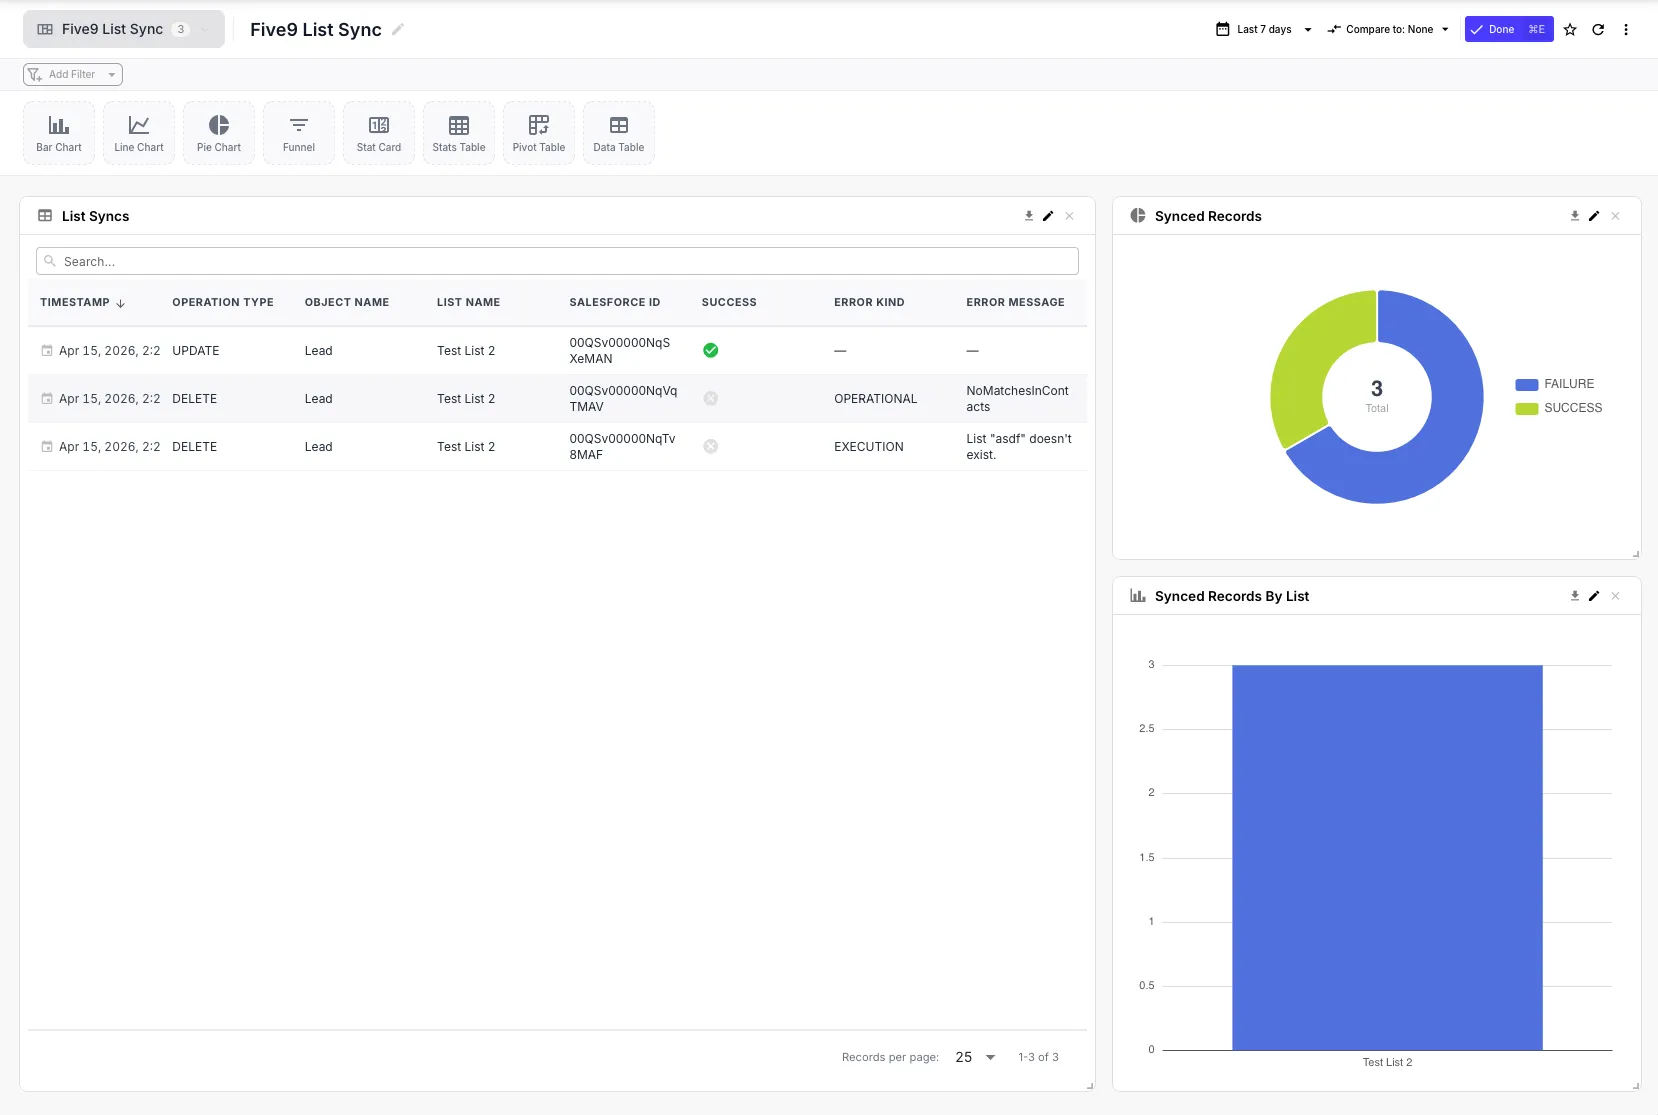
Use it to:
- Find a specific record — search by Salesforce ID, list name, or operation type
- Triage a batch of failures — filter by date range and error kind (e.g.
FIVE9_INVALID_ACCOUNT,FIVE9_RATE_LIMITED) - Spot patterns — the donut chart shows overall success/failure mix; the bar chart shows volume per Five9 list
Common error kinds you’ll see in the table, drawn from the Five9 error taxonomy:
FIVE9_INVALID_ACCOUNT/FIVE9_AUTH_FAILED— credentials need rotation or the connection needs updatingFIVE9_INVALID_ARGUMENT— Five9 rejected the payload shape (usually a field-mapping mismatch)FIVE9_NOT_FOUND— the target list, contact, or campaign doesn’t exist in Five9 with the name expectedFIVE9_RATE_LIMITED— Five9 throttled the call. The integration retries transient throttles automatically; sustained throttling shows up here only after retries are exhaustedFIVE9_SERVICE_UNAVAILABLE— transient Five9 outage. The integration retries automaticallyFIVE9_DUPLICATE— record already present in the target list (often expected on re-imports)DRY_RUN— dry-run mode skipped the actual call (a success entry, not a failure)
Most issues can be resolved from the dashboard alone. The error message column usually tells you exactly what went wrong; the error kind tells you what kind of fix it needs (credential, mapping, list config, transient).
Executions view (deep dive)
Section titled “Executions view (deep dive)”When the Sync Dashboard row doesn’t give you enough detail, open the underlying Execution for a full per-step trace: input/output at every step, timing, and stack traces.
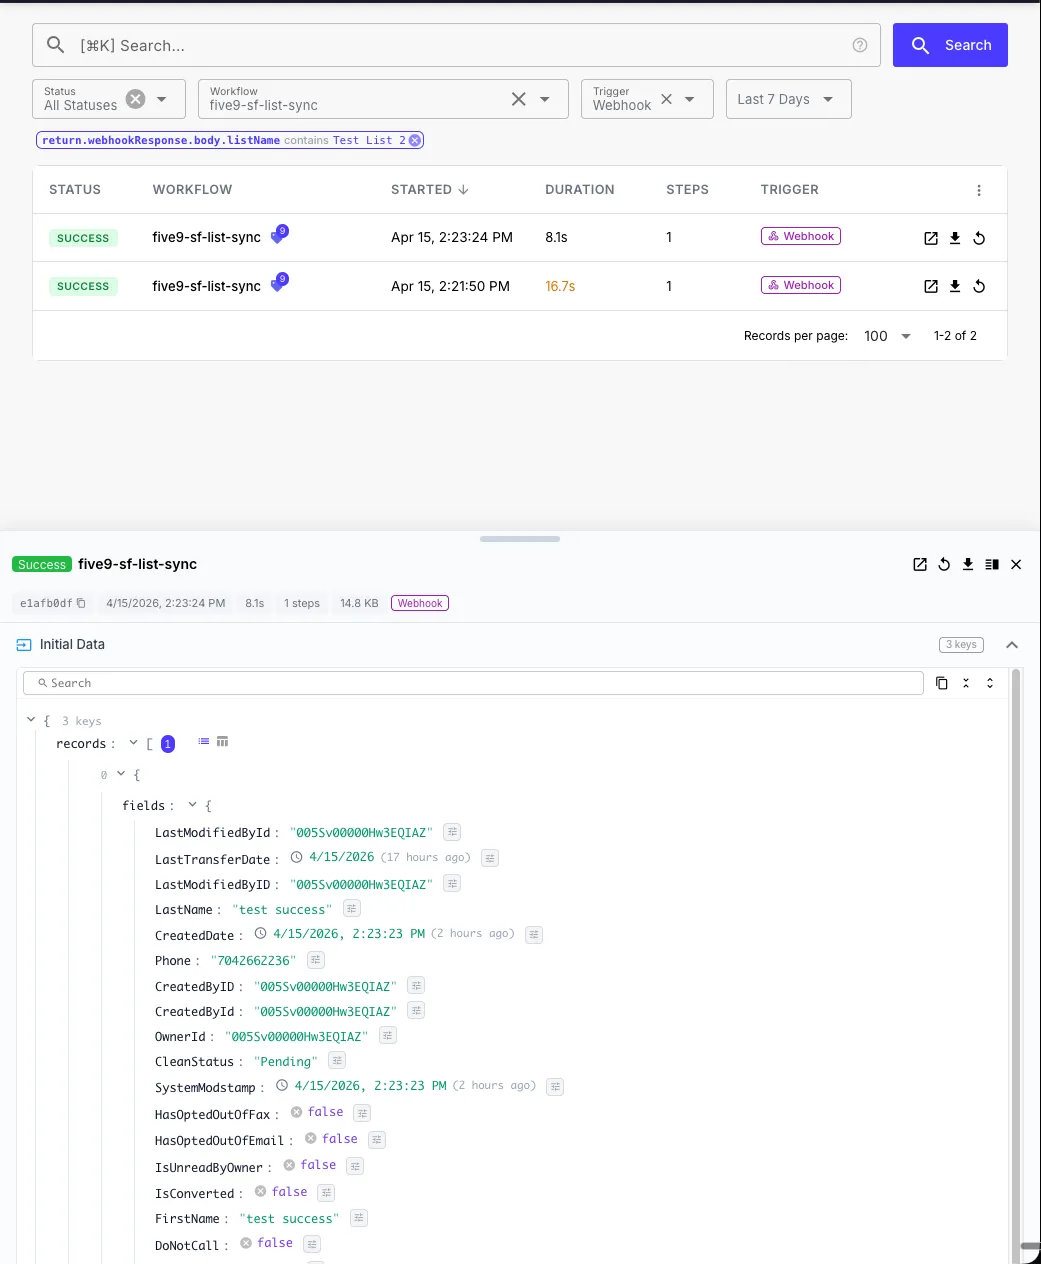
- In QuickFlo, open the List Sync workflow → Executions.
- Filter by status or by a searchable attribute (e.g. Salesforce ID if tagged).
- Click into a failed execution to see which step failed, the exact payload each step received, and the Five9 API response.
Salesforce: View the Dead-Letter Queue
Section titled “Salesforce: View the Dead-Letter Queue”Every failed webhook delivery is recorded as a QF_Sync_Error__c record. To view them:
-
Open the App Launcher and search for QuickFlo Sync Errors.
-
Each record shows:
- Object and Record ID that triggered the event
- Event Type (Insert / Update / Delete)
- HTTP Status Code returned by QuickFlo
- Error Message — the first 32 KB of the response body
- Request Payload — the first 131 KB of what was sent
-
After fixing the downstream issue, you can re-send failed records by toggling the source record (any trivial update will re-trigger the webhook), or by running a data fix in Apex.
Salesforce: Read Debug Logs
Section titled “Salesforce: Read Debug Logs”When a webhook isn’t firing and there’s no dead-letter record, the Apex trigger itself may be the issue. Turn on debug logs to see what’s happening:
-
Enable Debug Logs
Setup → Debug Logs → New. Set the Traced Entity to the user who’s making the changes, and use a log level with Apex: FINEST and Callouts: FINEST.
-
Reproduce the change
Perform the DML operation (create, update, or delete a record on a tracked object).
-
Open the log
Back in Debug Logs, click the most recent entry. Search for
QuickFlo— the connector prefixes every debug line so it’s easy to find. -
What to look for
QuickFlo: Rule eval— shows which rules passed or failedQuickFlo: Enqueueing batch— confirms the async job was scheduledQuickFlo: HTTP 200/QuickFlo: HTTP 5xx— the response from your webhookQuickFlo: Retry #N— backoff attempts on transient failures
Troubleshooting
Section titled “Troubleshooting”A New Record Fires Both a Create and an Update
Section titled “A New Record Fires Both a Create and an Update”The record tripped automation that re-saved it in the same transaction: a workflow field update, a Flow, or (on a Lead or Case) an assignment rule. Salesforce fires the insert, runs the automation, then fires the update. This is expected, not a bug. See The create-then-update case above for which automations cause it and why it shows up more on hand-created records than on bulk imports.
If you don’t need to distinguish creates on this object and it is never bulk-loaded, turn off Track Creation. Otherwise dedupe downstream on record Id.
Nothing Fires at All
Section titled “Nothing Fires at All”- Open the QuickFlo Executions view first — if you see the event arrive there, the Salesforce side is fine and the issue is in the workflow itself.
- If QuickFlo shows nothing, check the Active toggle in Connection Settings.
- Confirm the object’s Active toggle is on.
- Confirm at least one of Track Creation / Track Updates / Track Deletes is checked.
- If you have Trigger Rules, confirm the record actually matches them — add a temporary “always true” rule (e.g.
Id is not blank) to isolate whether the rules are the gate. - Check QuickFlo Sync Errors in Salesforce for delivery failures.
”Unauthorized endpoint” Callout Error
Section titled “”Unauthorized endpoint” Callout Error”This means the Remote Site wasn’t added (or was added with a different URL). See Add the Remote Site above.
Duplicate Events After Bulk Import
Section titled “Duplicate Events After Bulk Import”By default, data loader and similar tools will trigger webhooks for every imported record. If you’re seeding data, temporarily toggle Active off in Connection Settings, perform the import, then toggle it back on.