Code Step
The Code step (core.code) lets you drop arbitrary TypeScript into a workflow and run it inside a sandboxed Deno subprocess. Use it as an escape hatch when no other step does exactly what you need — pulling a battle-tested third-party library from npm, doing a one-off data shape transformation, calling an API client that needs a real SDK, or building any custom logic that’s faster to write than to express through visual steps.
You write what looks like an async function body. Whatever you return becomes the step’s output, available to downstream steps as {{ <step-id>.* }} everywhere else in the workflow.
// Available in scope: $env, $connections, $steps, $vars, initial// Whatever you return becomes the step output.
return { hello: 'world' }
That’s a complete, working code step. Save it, run it, and downstream steps can reference {{ my-code-step.hello }} to read 'world'.
When to use it
Section titled “When to use it”Reach for the Code step when:
- You need an existing npm or jsr package that no other step covers — a battle-tested SDK, a parser, a phone-number library, a CSV transformer, etc.
- You’re doing a one-off data shape transformation that would take 6 nested
data.map/data.filtersteps to express but is 10 lines of TypeScript. - You need conditional logic that’s clearer in code than in JSONLogic — multi-branch decisions with intermediate variables, recursive computations, etc.
- You’re prototyping something before you decide whether it deserves a first-class step.
For everything else — HTTP requests, AI calls, data transforms, file ops, control flow — use the dedicated steps. They’re faster, easier to read, and don’t need a code review.
The editor
Section titled “The editor”The Code step opens a full code editor right inside the workflow builder, with:
- Real TypeScript syntax highlighting and error reporting
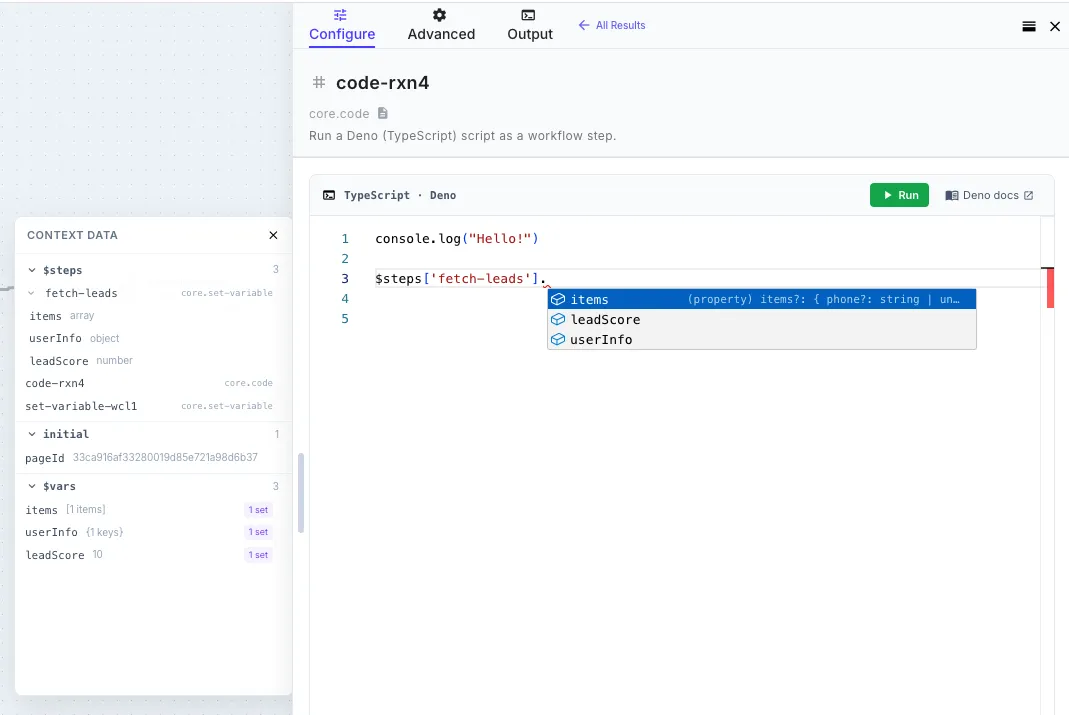
- Intellisense and autocomplete for everything in scope — type
$env.and you’ll see your environment variables. Type$steps.and you’ll see every prior step in the current workflow with its actual output shape inferred from the most recent run. Type$vars.and you’ll see whatever yourset-variablesteps have written. - Inline documentation hovers for the platform bindings
- A Run button that executes the script using the workflow’s most recent execution data, so you can test and iterate without saving the whole workflow first
- Console output capture — anything you
console.logshows up in the panel below the editor (more on this below)
The intellisense uses runtime type inference. The first time the workflow runs, the engine records the actual shape of every step’s output. From then on, the editor shows you the real fields available — including nested arrays, optional fields, and types — instead of generic any. Run the workflow once, and the editor knows your data.
What’s available in scope
Section titled “What’s available in scope”Five platform bindings are always destructured into scope. You don’t import them — they’re just there:
| Binding | What it is |
|---|---|
$env | Your encrypted environment variables, decrypted at runtime. e.g. $env.STRIPE_SECRET |
$connections | Your connection credentials by name. e.g. $connections['my-salesforce'].accessToken |
$steps | Outputs from every step that ran before this one in the same workflow, keyed by step ID. e.g. $steps['fetch-customer'].body.email or $steps['parse-csv'].items |
$vars | Workflow variables set by Set Variable steps. e.g. $vars.customerName |
initial | The trigger payload that started the workflow run. e.g. initial.city (webhook), initial.form.email (form), etc. — see Template Syntax → Initial Data for the per-trigger shapes |
Field references that work in Liquid templates work the same way in code. {{ fetch-customer.body.email }} in a Liquid string is $steps['fetch-customer'].body.email in a code step.
Imports
Section titled “Imports”The Code step runs on Deno, so you can import any of:
| Source | Syntax |
|---|---|
| npm | import phoneNumber from 'npm:libphonenumber-js' |
| jsr | import { parseCSV } from 'jsr:@std/csv' |
| HTTPS URL | import { z } from 'https://deno.land/x/zod/mod.ts' |
| Standard library | Most of the Deno standard library |
Imports must be at the top of the script (not inside the function body — Deno requires top-level imports). The wrapper hoists them above the user-function automatically, so as far as you’re concerned you can write:
import parsePhoneNumber from 'npm:libphonenumber-js'import { DateTime } from 'npm:luxon'
const phone = parsePhoneNumber('+1 415 555 0100')const reportedAt = DateTime.now().setZone('America/Los_Angeles')
return {  phone: phone.formatInternational(),  country: phone.country,  reportedAt: reportedAt.toFormat('EEEE, MMM d, yyyy h:mm a ZZZZ'),}
The first time you import a new package, Deno fetches and caches it on the worker. Subsequent runs reuse the cached copy.
Importing types from a separate @types package
Section titled “Importing types from a separate @types package”Most modern npm packages ship their own types. For older ones that publish types via a separate @types/<name> package (the classic Node convention), use Deno’s @deno-types directive on the line directly above the import:
// @deno-types="npm:@types/lodash"import _ from 'npm:lodash'
return { sum: _.sum([1, 2, 3, 4, 5]) }
The directive tells Deno to use @types/lodash for type information when checking the lodash import — same effect as installing both packages in a Node project. The runtime behavior is unchanged; only the editor’s type info improves.
Console output
Section titled “Console output”Anything you console.log, console.info, console.warn, console.error, etc. is captured and shown in the Console Output panel below the editor when you Run the step, and in the execution trace when the workflow runs in production.
for (let i = 0; i < 100; i++) {  console.log({ message: `hello ${i}` })}
return { processed: 100 }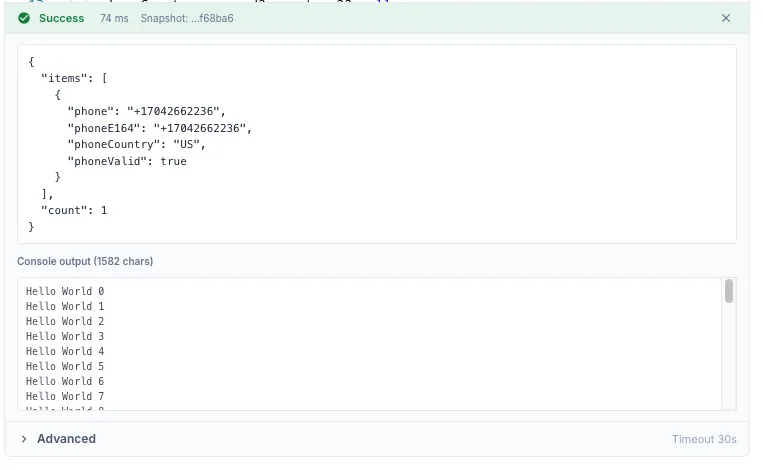
All console methods route through stderr internally (stdout is reserved for the script’s return value envelope), but you don’t have to think about that — console.log just works.
The console buffer is capped at 1 MB. If you exceed that, older lines are dropped silently. For large debugging dumps, return the data instead and inspect it in the execution trace.
Return value
Section titled “Return value”Whatever you return becomes the step’s output. The shape is flexible:
| You return | Downstream sees |
|---|---|
return { foo: 'bar', count: 42 } | { foo: 'bar', count: 42 } — referenced as {{ my-code.foo }}, {{ my-code.count }} |
return [1, 2, 3] | { data: [1, 2, 3] } — referenced as {{ my-code.data }} |
return 'hello' | { data: 'hello' } — primitives are wrapped in data |
return null or no return at all | {} — empty object |
For predictable downstream access, return an object with named fields. The auto-wrap for primitives and arrays is a safety net; explicit objects are clearer.
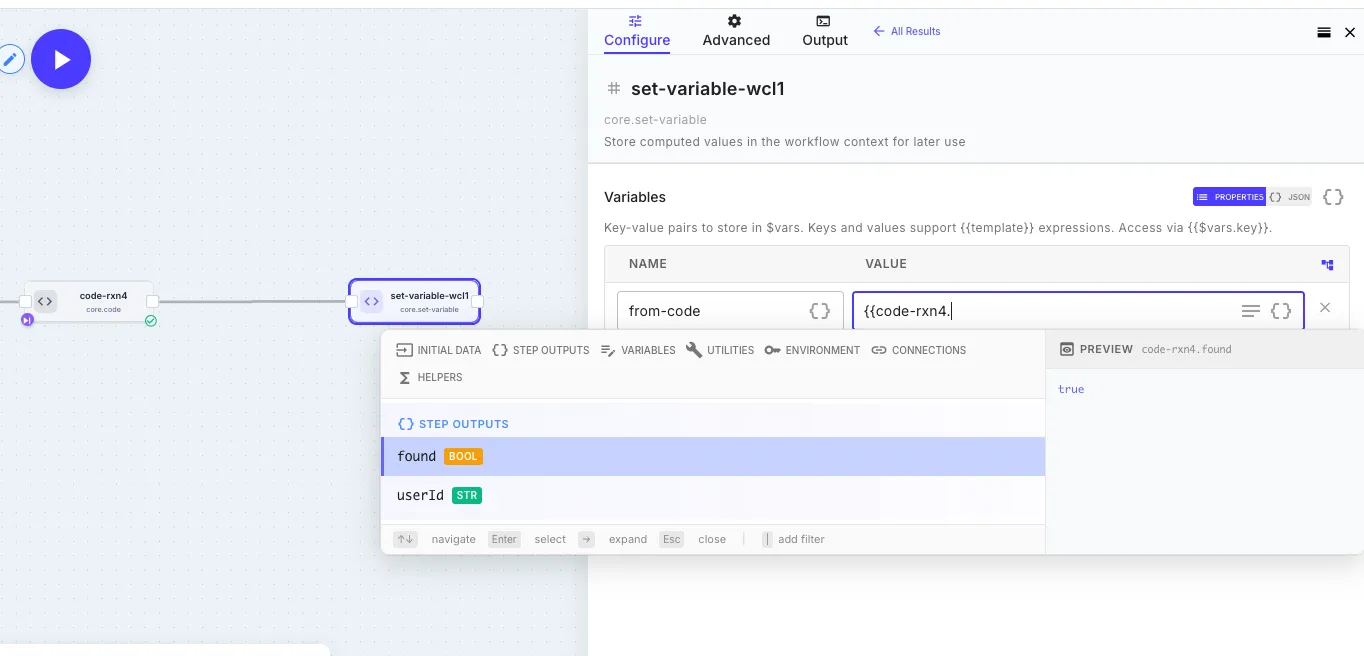
The screenshot above shows the round trip: a code step that returned { found: true, userId: '...' } exposes those exact field names to downstream steps. The Set Variable step’s autocomplete picks them up automatically — including their inferred types (bool, str) — and the preview pane on the right resolves the reference to its actual value. No type stubs to write, no schema to maintain.
Returning an operational error
Section titled “Returning an operational error”By default, the way to fail a Code step is to throw:
if (!$env.STRIPE_SECRET) { throw new Error('STRIPE_SECRET environment variable is not set')}A throw halts the workflow exactly like any other step exception — same as the Error Handling model used by HTTP, Five9, and other steps. Wrap with Continue on Error to absorb it.
There are also two opt-in error keys you can include in your return value. The rest of the return object is preserved and inspectable downstream — just like an HTTP step’s 4xx response leaves the body readable.
$error — marks the step as failed operationally. Workflow halts unless continueOnError:
const result = await fetchSomething()
if (result.status >= 400) {  return {    statusCode: result.status,    body: result.body,    $error: 'Upstream returned ' + result.status,  }}
return { ok: true, data: result.body }
$warning — step succeeds with a warning logged. Workflow continues automatically:
return { partialData: rows.slice(0, 50), $warning: { code: 'PARTIAL_SYNC', message: 'Only the first 50 rows were processed', },}Both keys accept a string or { code, message }. If both are present, $error takes precedence.
The key is stripped from the visible output before downstream steps see it — they only see the rest of your return object. The error/warning is exposed via $meta.operationalErrors and the global $errors array.
Retrying specific $error codes
Section titled “Retrying specific $error codes”A returned $error is a permanent operational failure by default — the engine won’t retry it, because the whole point of returning an error instead of throwing is to say “this isn’t transient, handle it.” You can carve out specific codes that are retryable by listing them in Retryable Error Codes under Advanced retry overrides in the step’s Error Handling panel:
try { const result = await callPartnerApi(input) return { result }} catch (err) { if (err.status === 429) { // Transient — tag with a code the engine knows to retry return { $error: { code: 'RATE_LIMITED', message: 'Partner rate limit hit' } } } // Permanent — engine will not retry, workflow halts (or continues // past it if continueOnError is on) return { $error: { code: 'PARTNER_ERROR', message: err.message } }}With RATE_LIMITED listed in the Retryable Error Codes field, the engine retries the step up to Max Retries before treating the failure as permanent. PARTNER_ERROR is never retried because it’s not in the list. See Error Handling → Matching error codes to retries for the full model and how it compares to the HTTP step’s retry semantics.
Local development workflow
Section titled “Local development workflow”The editor has full intellisense and a Run button, so most of the time you can develop a code step entirely inside QuickFlo. But for longer scripts you might prefer your local editor:
-
Open your local editor (VS Code, Cursor, whatever) and create a
.tsfile. -
Stub the platform bindings at the top so TypeScript stops complaining:
declare const $env: Record<string, string>declare const $connections: Record<string, Record<string, unknown>>declare const $steps: Record<string, Record<string, unknown>>declare const $vars: Record<string, unknown>declare const initial: Record<string, unknown> -
Write your script. Use real types where you know them (e.g.
const customer = $steps['fetch-customer'] as { id: string; email: string }). -
Run it locally with Deno if it doesn’t depend on
$env/$connections/etc., or mock those values for local testing. -
Paste the script into the QuickFlo editor. The wrapper handles top-level imports automatically — paste exactly what you wrote, including the imports.
-
Click Run in the editor to execute against the workflow’s actual data. Iterate from there.
Sandbox & restrictions
Section titled “Sandbox & restrictions”The Code step runs inside a locked-down Deno subprocess. Permissions:
| Permission | Allowed? |
|---|---|
Network (--allow-net) | ✓ Yes — for npm imports and outbound HTTP from your script |
Filesystem read (--allow-read) | ✗ No (see note) |
Filesystem write (--allow-write) | ✗ No |
Environment access (Deno.env) | ✗ No — use $env instead |
Subprocess execution (Deno.run) | ✗ No |
FFI (--allow-ffi) | ✗ No |
System info (--allow-sys) | ✗ No |
If you need to read or write a file, use the File steps. If you need an environment variable, put it in Environments and read it via $env.
Limits
Section titled “Limits”| Limit | Default | Max |
|---|---|---|
| Timeout | 60 seconds | 5 minutes (300,000 ms) |
| Stdout (return envelope) | 25 MB | 25 MB |
| Stderr (console output) | 1 MB ring buffer | 1 MB ring buffer |
The timeout is configurable per-step under Advanced in the editor. If your script needs more than 5 minutes, you’re probably doing too much in one step — split it into multiple steps, or use a for-each loop over chunks.
If you exceed the stdout cap (25 MB return value), the subprocess is killed and the step fails. For large datasets, write to a data store inside the script and return just a summary.
Code steps retry thrown errors by default (3 attempts, exponential backoff) — the same treatment as HTTP and other external-facing steps. If your script isn’t safe to re-run (charges payments, writes to external systems, etc.), turn Retry on Failure off in the step’s Error Handling panel. See Error Handling → Retry policies for the full model, including the $error.code → Retryable Error Codes pattern for classifying which operational failures should be retried.
Code steps inside for-each loops
Section titled “Code steps inside for-each loops”A code step cannot live inside a for-each loop that runs iterations in parallel (concurrency greater than 1). Saving a workflow with that combination is rejected with a clear error.
You have two alternatives, in increasing order of preference:
-
Set the for-each concurrency to 1. Iterations run one at a time.
-
Move the code step outside the loop and iterate inside the script. Your script gets the upstream array on
$steps, and you can do the loop in TypeScript:const items = $steps['fetch-leads'].items as Array<{ phone: string }>const results = items.map((item) => {// ...transform each item...return { ...item, normalised: true }})return { items: results, count: results.length }This is faster than the for-each approach and gives you the full power of TypeScript over the whole batch — sorting, grouping, accumulators, anything.
Examples
Section titled “Examples”Phone number normalization with libphonenumber-js
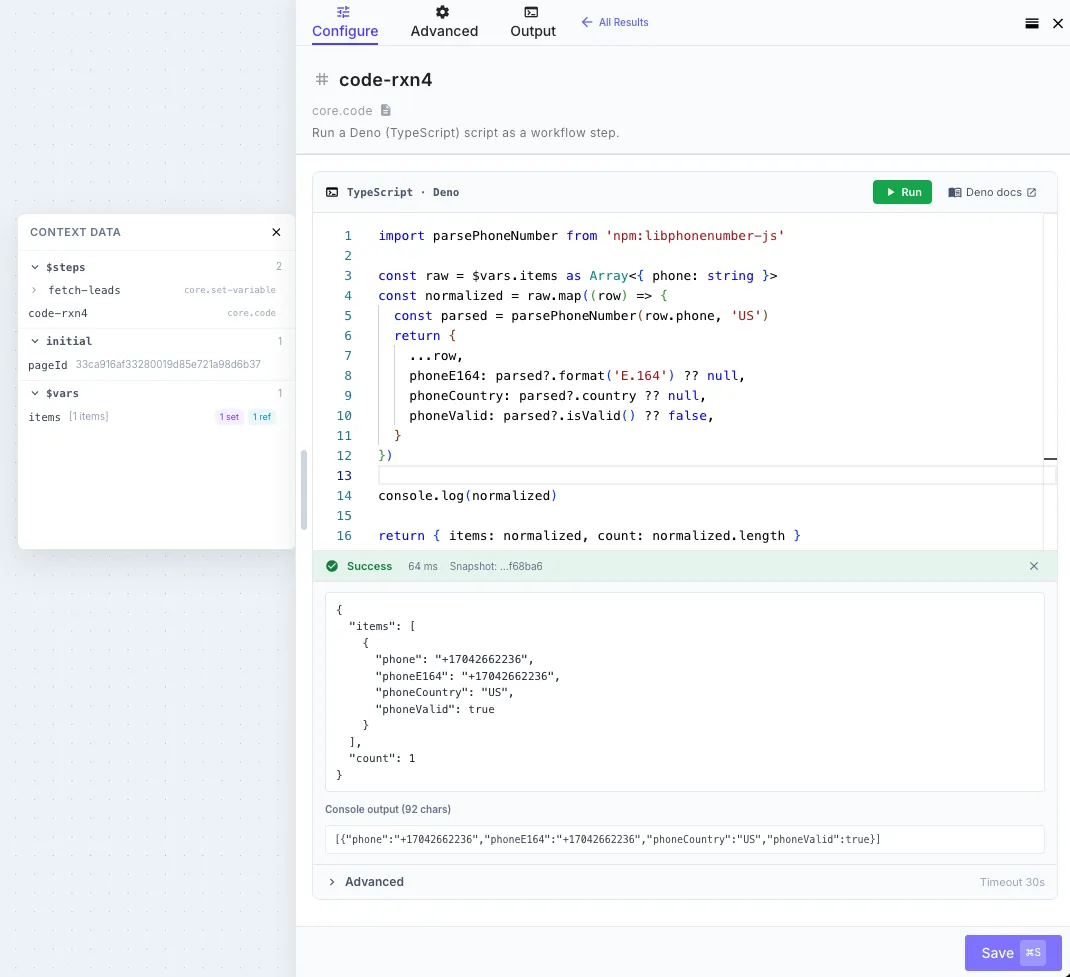
Section titled “Phone number normalization with libphonenumber-js”import parsePhoneNumber from 'npm:libphonenumber-js'
const raw = $steps['fetch-leads'].items as Array<{ phone: string }>const normalized = raw.map((row) => { const parsed = parsePhoneNumber(row.phone, 'US') return { ...row, phoneE164: parsed?.format('E.164') ?? null, phoneCountry: parsed?.country ?? null, phoneValid: parsed?.isValid() ?? false, }})
return { items: normalized, count: normalized.length }Fetching a Notion page as Markdown
Section titled “Fetching a Notion page as Markdown”Notion’s official SDK plus the notion-to-md converter gives you a clean way to pull a Notion page into a workflow as Markdown — useful for sync jobs, AI document ingestion, or anything that needs Notion content as text. Both libraries are pure JS and only need network access, so they run cleanly in the sandbox.
import { Client, isFullPage } from 'npm:@notionhq/client@2'import { NotionToMarkdown } from 'npm:notion-to-md@3'
const notion = new Client({ auth: $env.NOTION_TOKEN })const n2m = new NotionToMarkdown({ notionClient: notion })
const pageId = initial.pageId as string
// Retrieve the page. `pages.retrieve` returns a union of the full response// and a partial response — narrow it with the SDK's built-in type guard so// `page.properties` is safely accessible below.const page = await notion.pages.retrieve({ page_id: pageId })if (!isFullPage(page)) {  throw new Error(    'Notion returned a partial page response. Make sure the integration has access to this page.',  )}
// Find the title property by *type* — Notion databases let users rename the// title column to anything (Title, Item, etc.), but exactly one property per// page has type 'title'.const titleProp = Object.values(page.properties).find((p) => p.type === 'title')const title =  titleProp?.type === 'title'    ? titleProp.title.map((t) => t.plain_text).join('') || 'Untitled'    : 'Untitled'
// Convert the page body to Markdown.const blocks = await n2m.pageToMarkdown(pageId)const markdown = n2m.toMarkdownString(blocks).parent ?? ''
return {  title,  markdown,  lastEditedTime: page.last_edited_time,  notionId: page.id,}
A downstream step can pipe {{ fetch-notion-page.markdown }} into an LLM Call for summarization, write it to a data store, or post it to Slack as a digest. To sync a whole database instead of a single page, wrap this in a for-each loop over notion.databases.query results.
Conditional logic with multiple data sources
Section titled “Conditional logic with multiple data sources”const customer = $steps['lookup-customer'].body as { tier: string; createdAt: string }const orders = $steps['fetch-orders'].body as Array<{ amount: number; status: string }>
const lifetimeValue = orders .filter((o) => o.status === 'paid') .reduce((sum, o) => sum + o.amount, 0)
const customerAgeDays = (Date.now() - new Date(customer.createdAt).getTime()) / 86400000
let segment: stringif (customer.tier === 'enterprise') segment = 'enterprise'else if (lifetimeValue > 10000) segment = 'whale'else if (customerAgeDays < 30) segment = 'new'else segment = 'standard'
return { segment, lifetimeValue, customerAgeDays }Returning a structured operational error
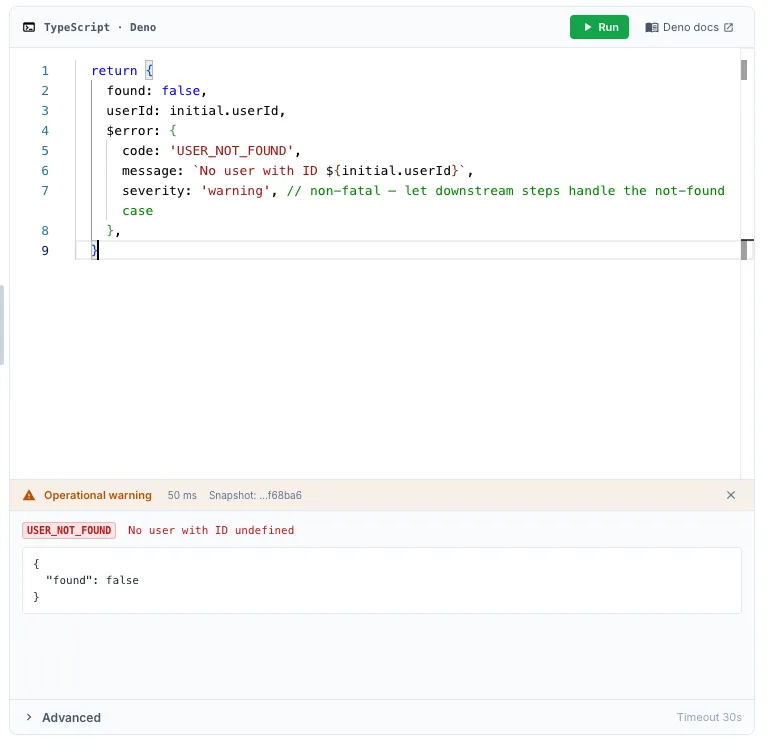
Section titled “Returning a structured operational error”const response = await fetch(`https://api.example.com/users/${initial.userId}`, { headers: { Authorization: `Bearer ${$env.API_TOKEN}` },})
if (response.status === 404) { return { found: false, userId: initial.userId, $warning: { code: 'USER_NOT_FOUND', message: `No user with ID ${initial.userId}`, }, }}
if (!response.ok) { throw new Error(`API returned ${response.status}: ${await response.text()}`)}
const user = await response.json()return { found: true, user }Further reading
Section titled “Further reading”- Deno manual — official Deno docs for the runtime
- Deno standard library — battle-tested utilities for CSV, YAML, encoding, crypto, etc.
- JSR — modern TypeScript package registry with first-class Deno support
- Error Handling — how
$errorand$warningfit into QuickFlo’s error model (retry,continueOnError,$errors) - Template Syntax → Variables — the same
$env,$connections,$vars,$steps,initialbindings, but as Liquid templates for non-code steps